


There’s more to generator maintenance than letting the machine run for a half hour each week. It’s also important to change the oil regularly. Not only does this maximize performance, but it increases efficiency too. This guide will teach you how to change your generator oil in 10 easy steps. Let’s get started.
Step 1 – Gather Your Tools

Before you learn how to change oil, you’ll need to gather a few tools. This ensures you follow the oil change steps safely.
- Owner’s manual – The owner’s manual tells you how often to change your generator oil, what grade of oil to use, and how much to pour. You’ll also learn where to locate different parts of the generator.
- Protective goggles – Goggles shield the eyes from oil splashes.


- DEWALT ToughCoat hard coated lens provides tough protection against scratches.
- DEWALT anti-fog lens coating provides tough protection against fogging.
- Soft, dual injected rubber conforms to the face to provide a high level protection from dust and debris.
- Adjustable, elastic cloth head strap provides a comfortable fit.
- Ventilation channels allow breathability and added protection against fogging.

- Protective gloves – When handling hot greasy parts, you need a good pair of protective gloves. Opt for gloves with nitrile-coated palms and fingers to keep hands safe.


- Tools for Your Hands: Maximum hand protection and dexterity for automotive jobs and more
- Disposable: Nitrile Non Latex Gloves are designed to tackle everything from an oil change to a tune up
- Made for Sensitive Skin: Latex-free construction ideal for skin sensitivities; Use them as gardening gloves, fishing gloves, mechanic gloves, tactical gloves, shooting gloves, driving gloves, and so much more
- Chemical and Water Resistant: Take on any task; Perfect for changing oil, painting, working with chemicals, and adding extra grip to daily tasks like general cleaning
- Touchscreen Compatible - Save time without having to remove your glove; gloves fit either hand
- Sturdy work surface – You’ll need a stable workspace while working on the generator. Depending on the size, you may opt for a worktable or the ground. Although a worktable lets you work comfortably without bending, the generator may weigh too much to lift.
- Blocks – Cement blocks allow you to raise the generator high enough to remove the drain plug and drain the oil.
- Fresh oil – The moving parts of a generator create a lot of friction and heat. Without oil, the engine can lock up. Fresh oil keeps the engine cool, clean, and lubricated.
- New filter – An oil filter removes contaminants. Over time, it can accumulate gunk, clog the system, and seize the engine. Some filters have an arrow indicating which direction to install them for the best oil flow. Review the owner’s manual for the filter recommendations.
- Oil pan – An oil pan or container allows the liquid to drain in one place without making a mess.
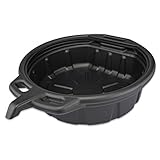
- [QUALITY]: Oil drip tray is constructed of high quality, recyclable polythene plastic that is resistant to corrosion so your oil pan will remain durable for carrying oil, gasoline, and antifreeze.
- [CONVENIENT]: Anti splash curled lip edge prevents any splashing that can occur while moving the pan.
- [SIZE]: Deep 5" x 12.55" pan can hold a high capacity up to two gallons/8 liters making it the perfect oil pan for oil changes.
- [PORTABLE]: Easy grip handles on both sides of the pan makes for easy transportation and attached spout makes for easy draining into large openings.
- [COMPACT]: Sturdy handle makes for convenient hanging when not in use and low profile makes it easy to store away.
- Oil funnel – This tool has a wide mouth and a narrow neck, allowing you to pour fresh oil into the spout without spillage.

- 【Meet Multiple Uses】The Funnels set includes 1 large flexible funnel with long hose and 4 regular plastic funnels,can meet different needs in your daily life.
- 【Long hose for Oil Change】The automotive funnel with tube can effectively solve the problem that the funnel spout cannot reach the oil tank.
- 【Thoughtful Design】The car oil funnel with a removable mesh screen filter strainer is good for filtering foreign objects while you are changing the engine oil gas or coolant.
- 【Rapid Filling】Wide mouth funnel with large spout allows the liquid to pass through the fuel funnel quickly, so you don't have to worry about spilling.
- 【Handle Design】The gas funnel with a handy handle on the gas funnel side, so you can easy to stabilize the funnel by one hand while you change the gas or antifreezer .
- Cleaning tools – Use a clean brush and cloth to clear away oil and grime.
- Oil filter wrench – Because oil filters can become greasy, they may be difficult to remove. Some people use a standard wrench. Others prefer to use their hands. But for the best grip, an oil filter wrench gets the job done.

- TIPS: 1. BENT head design for easier use in some tight space; 2. OIL on product for rust protection (not used)
- Permalock fastener eliminates nut and bolt failure
- High carbon steel for strength and reliability
- Fits oil filters from 2-3/8 to 4-1/2 inches (60 to 102 millimeters) in diameter
- Soft, Nonslip Red Grips Offer Extra Reach And Leverage In Tight Places
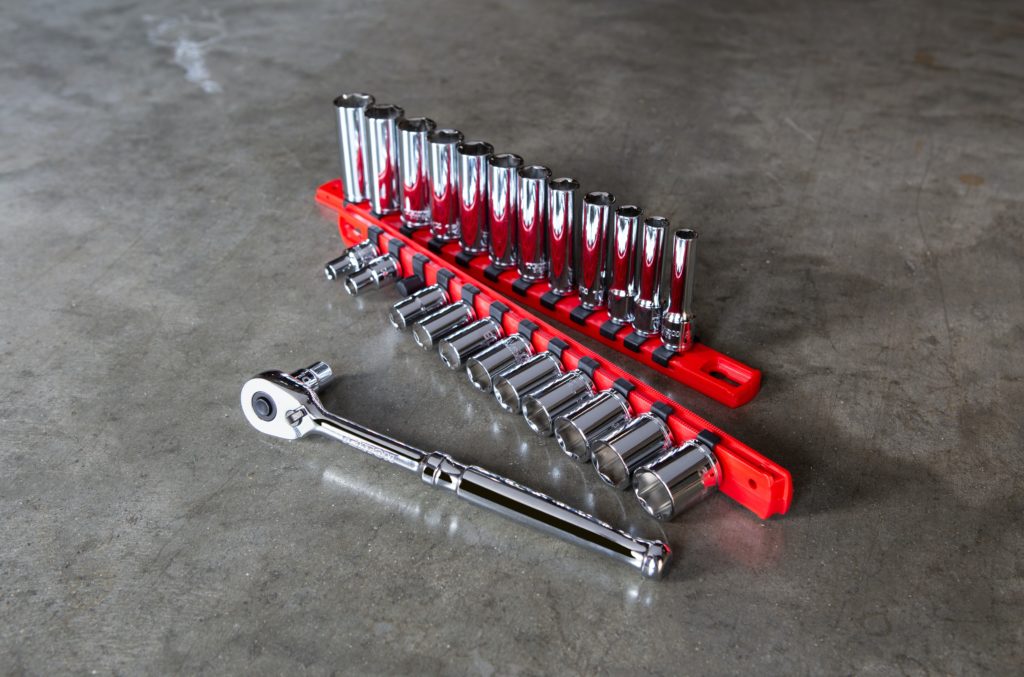
- Ratchet and socket set – A ratchet and socket set allows you to remove fasteners quickly.

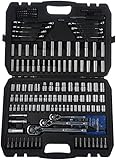
- Mechanic's 201-piece tool kit and socket set for tackling multiple sizes and types of fasteners, especially nuts and bolts
- Includes most popular 1/4, 3/8 and 1/2 inch sockets, hex keys, and screwdriver bits; both Metric and SAE sizes included
- Chrome-vanadium steel forged body for torque, strength, and durability
- Full polished-chrome finish provides anti-corrosion protection
- Case provides convenient tool storage and portability
- Screwdriver set – You may need a Phillips or flathead to remove the cover that seals the oil port.

- Improved durability & fit: black oxide tip provides improved durability and grip without compromising tip fitment
- Quick rotation control: speed and precision tactile zones provide quick rotation control for efficient run down and precision tasks
- Added grip texture: torque zone provides added grip texture and geometry for heavy torque applications
- Chrome finish for corrosion resistance and easy clean up
Step 2 – Warm the Old Oil
Start the generator and let it run for two to five minutes. Warm oil drains easier.
Step 3 – Prepare to Drain the Oil
Clear a sturdy work surface. Arrange large blocks on your workspace, leaving space underneath for an oil pan. Make sure the blocks are level before putting the generator on top. If the machine is weighty, get someone to help you lift it into position. You don’t want to strain your back trying to raise a heavy generator by yourself.
Step 4 – Disconnect the Spark Plug
With the generator on a stable surface, find the spark plug. If you’re having trouble locating the spark plug, consult your owner’s manual. First, remove the spark plug boot. Depending on the manufacturer, you may need a socket wrench. On some models, you can disconnect the spark plug with a simultaneous twist and pull motion. Be careful not to yank them apart. Doing so may cause damage. To prevent the engine from starting accidentally, separate the wire and spark plug.
Step 5 – Locate and Clean the Oil Drain Plug
Most generators have a 3/8-inch nut securing the drain plug. It may have a hexagon or square head. Again, you may need to review the manual to find the location. Once found, use a brush to remove the grime and a cloth to wipe away any oily residue.
Step 6 – Remove the Oil Plug
Grab a ratchet and a socket (the size will vary per manufacturer). With the drain pan in place, use the tools to unscrew the oil drain plug. Finish unfastening it with your hand. As soon as you pull the plug from its position, the old oil will flow out of the generator. Don’t forget the oil is full of contaminants and needs to be recycled.
Step 7 – Change the Oil Filter

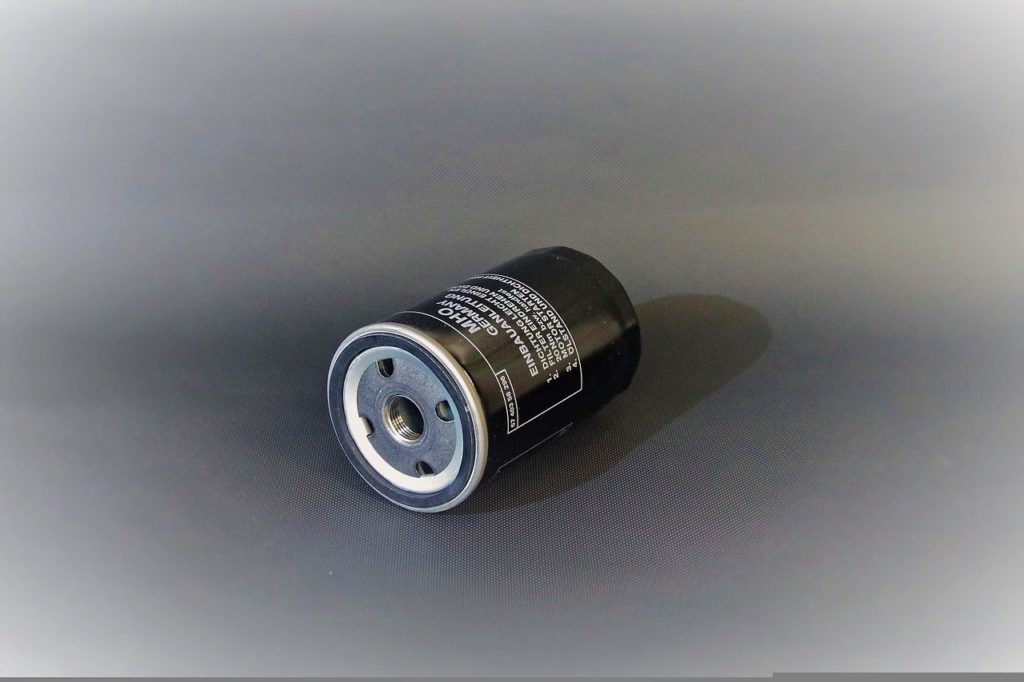
If your generator comes equipped with an oil filter, prepare to change it when you change the oil. You don’t want to run fresh oil through an old filter. Not only will this extend the life of your generator, but it also keeps the engine in good working order. With protective gloves on, use a wrench to untighten the filter and complete the process using your hands. Inspect the adapter. If necessary, wipe away any crud. Next, smear a little oil on the gasket for lubrication. Then, screw the filter back in place. If necessary, use a pair of pliers or a wrench to tighten. Generally, it only takes a half or three-quarters turn. Do not overtighten, as this will damage the filter. Put the old filter in a safe place with the old motor oil until you can take them to a local recycling center.
Step 8 – Tighten the Plug
With the new filter installed, return the drain plug to its position. Start with a manual turn. Then, use a socket wrench to tighten the plug.
Step 9 – Pour New Oil
With the oil fill cap removed, insert a funnel and pour the new oil into the generator. Use the dipstick to verify the oil level. If you consulted the owner’s manual mentioned in Step 1, you should know what type of oil to use and how much is required. After you pour the oil, remove the funnel and close the cap.
Step 10 – Reconnect the Spark Plug
Set the spark plug into its housing and secure it with a socket wrench. Then, grab the spark plug boot and slide it over the plug. That’s it. Restart the generator and let it run for a few minutes, allowing the clean oil to circulate and lubricate the engine. Next, cut off the machine. Then check the oil level again. If it is not within the required range, add more oil. Let it run again for a couple of minutes.
Generator Oil Changing Tips
Your generator’s engine must stay lubricated to run smoothly. Here are a few tips to help your generator operate more efficiently.
- Some manufacturers ship generators with the oil already installed. Check the level after opening the box, and add oil if necessary.
- When in doubt, refer to the owner’s manual for oil type and fill amount. If you have misplaced your manual, check out the manufacturer’s website.
- Change your oil filter each time you change the oil in your generator.
- Be prepared for power outages, and keep extra oil and filters on hand.
- Dusty areas tend to contaminate oil quickly. If running a generator in a dusty area, consider changing the oil more often.
Generator Oil Changing FAQs
The following information offers a general overview of frequently asked questions. Remember to review the owner’s manual for your specific brand. Not only will you find important details about your generator, but you can also explore troubleshooting tips.
You should change the oil in a new generator after the first 8 to 25 hours of use. In doing so, you’ll remove any contaminants the engine may have come into contact with during shipping. After that, experts recommend changing the oil every 100 hours of use.
Yes. It is easier to drain the old oil when it is warm.
The oil will solidify and turn into sludge, making it hard to lubricate vital components. Eventually, the metal parts will start to rub together and damage the engine.
Synthetic 5W-30 works in all temperatures but tends to burn quickly at high temperatures. SAE 30 works best at temperatures above 32 degrees Fahrenheit, and 10W-30 works well for temperatures below 40 degrees and -10 degrees Fahrenheit.
The oil capacity can range from .42 quarts for a Honda EU2000i to 1.2 quarts for a Champion 6250/5000-watt generator. Naturally, the bigger the wattage, the more oil is required.
Pouring too much oil into a generator may cause the engine to choke out and stall. It may also cause parts to wear prematurely. Ultimately, this will damage the engine and cause the generator to stop working.
Yes. Just like cars, generators have air filters to protect the engine from dirt and debris. If the filter becomes too dirty, it may prevent proper airflow to the engine. Therefore, you should change it when you change the oil.


